Children are naturally inquisitive. We see it all the time. Children marvel at the world around them. They ask questions and are passionate about so many different things.
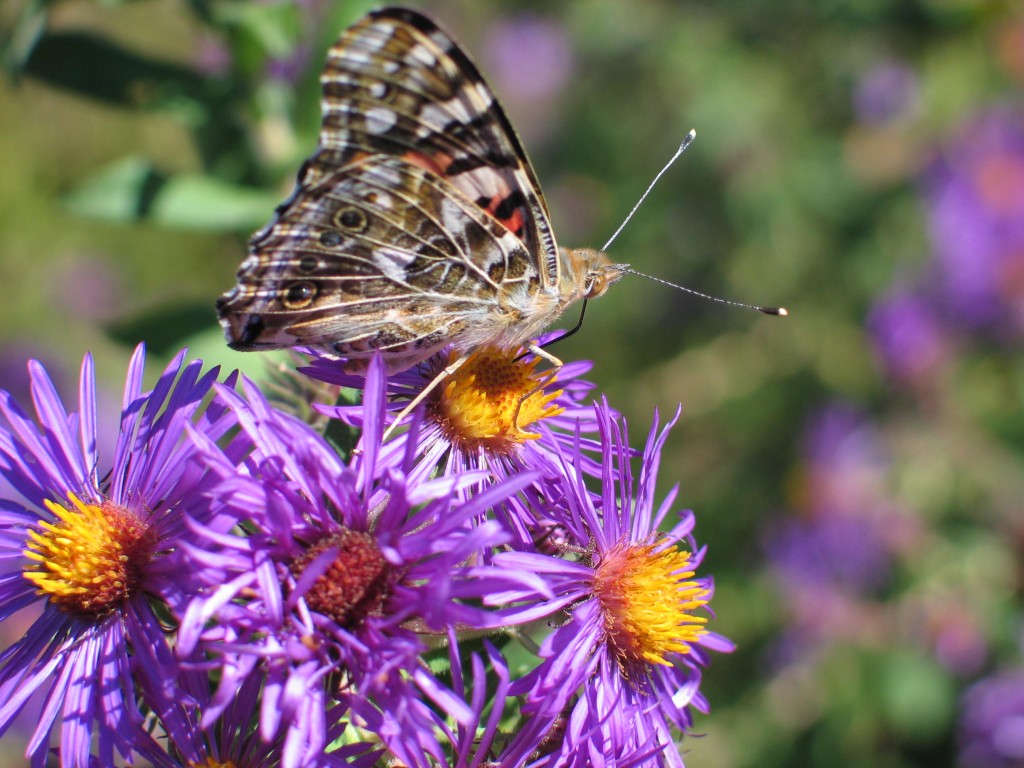
At some point along the way as we grow up, that desire to learn and observe gets muted. Often, I find myself walking past the natural world to the next task, not taking the time to enjoy the beauty around me. However, watching children around butterflies and other pollinators brings back the child in me. They marvel and are amazed by the smallest things, especially pollinators.
As we celebrate National Pollinator Week, I want to encourage you to look at these pollinators through a child’s eyes. Slow down and watch the mesmerizing and beautiful work of pollinators. If you have children or grandchildren, watch their eyes as they discover new things. Their eyes are wide open and and their minds are ready to learn.
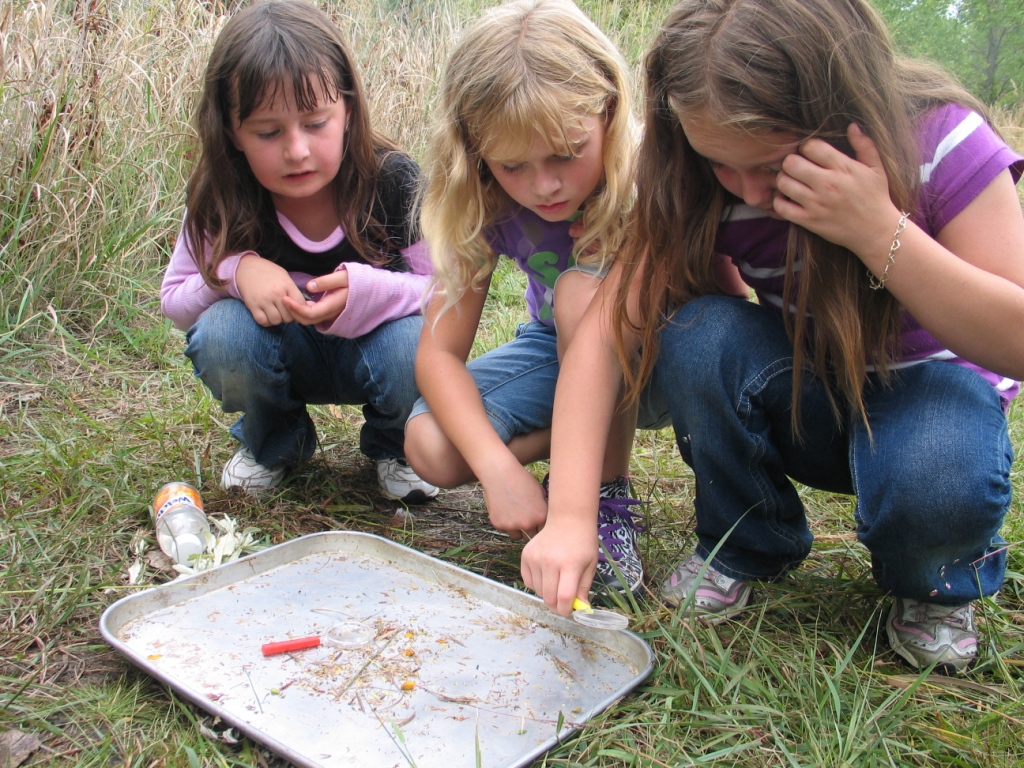
Students conducting an Insect Sweep
Children are also our future conservationists, land managers and biologists. Adventures into the wild can be transformational for these youngsters. We all know these connections to nature will plant a seed for the future. We need people who are passionate about the natural world and its management. And the younger we can develop those interests, the better.
So as you think about your garden and how you can save pollinators, think about your own transformative experiences. What was awe inspiring, what made you smile, and what had you never seen before? Simply having plants that attract pollinators will have an impact on pollinators in the present, but having people (you and your children or grandchildren) in your garden to love and appreciate them will save the pollinators into the future.
Thinking about starting a new garden using native plants is one thing, but putting in the time to get it established is another thing altogether. I was reminded today of the rewards you receive after working hard that first year to get your garden properly established. A design I had put together for a local couple last spring is now exploding in blooms and growth this year. They shared with me how amazed they are at the transformation those small plants have made in just one full year.
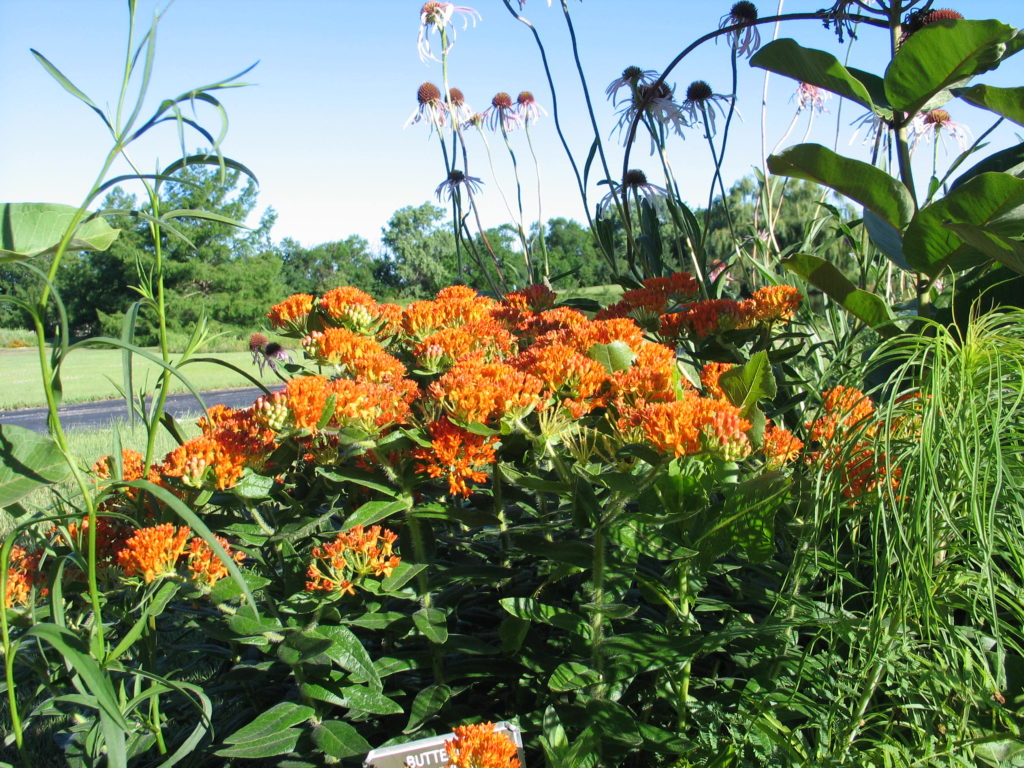
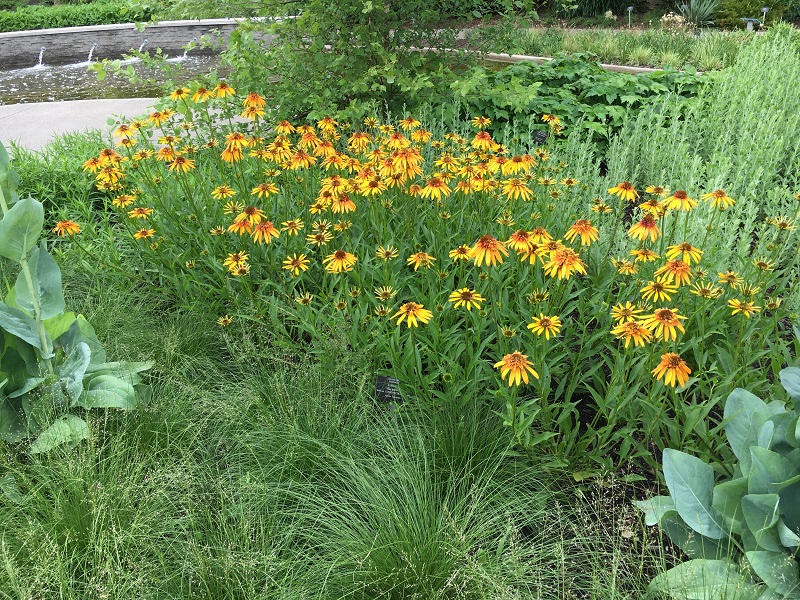
Butterfly Milkweed and Pale Purple Coneflowers
The second year
This couple had put in the necessary time and effort last year by watering and weeding their small garden. There will still be a need for some maintenance this season, but it will be greatly reduced because of their efforts last year.
Establishment is such an important step in the development of a new garden. You will still need to water during prolonged droughts and weed out invasive species. You will need to be vigilant until these natives are fully rooted and completely filling the space, crowding out weeds. Then you can let them fend for themselves, especially if you have done proper planning and chosen the right plants for the space.
Yellow Coneflower, Prairie Dropseed and Giant Black-eyed Susan
Beyond the second year
Keep in mind, your first garden doesn’t need to be perfect. More often than not, it won’t be perfect. However, remember that you are creating a habitat that blooms, attracts wildlife and pollinators and brings you enjoyment. It takes time to get the results we want.
Often we get discouraged by the amount of time and effort needed to keep our garden going that first year. Prolonged dry spells, wind, heat and weeds can easily take the fun out of it. Think long term and remember why you are doing this. I certainly have experienced that discouragement and burn out, but have been rewarded with beauty and wildlife as these natives take off the next few years.
Remain patient and vigilant when establishing a native plant landscape, especially those first few years. Each season, plants will shift in response to the weather and soil. Follow the plants’ lead, tidy up after them as you need, and fill gaps with new plants. It generally takes 2-5 years before the full benefits of your landscaping efforts pay off and wildlife find and use the native plants. An old adage says, “The first year a garden sleeps, the second year it creeps and the third year it leaps.”
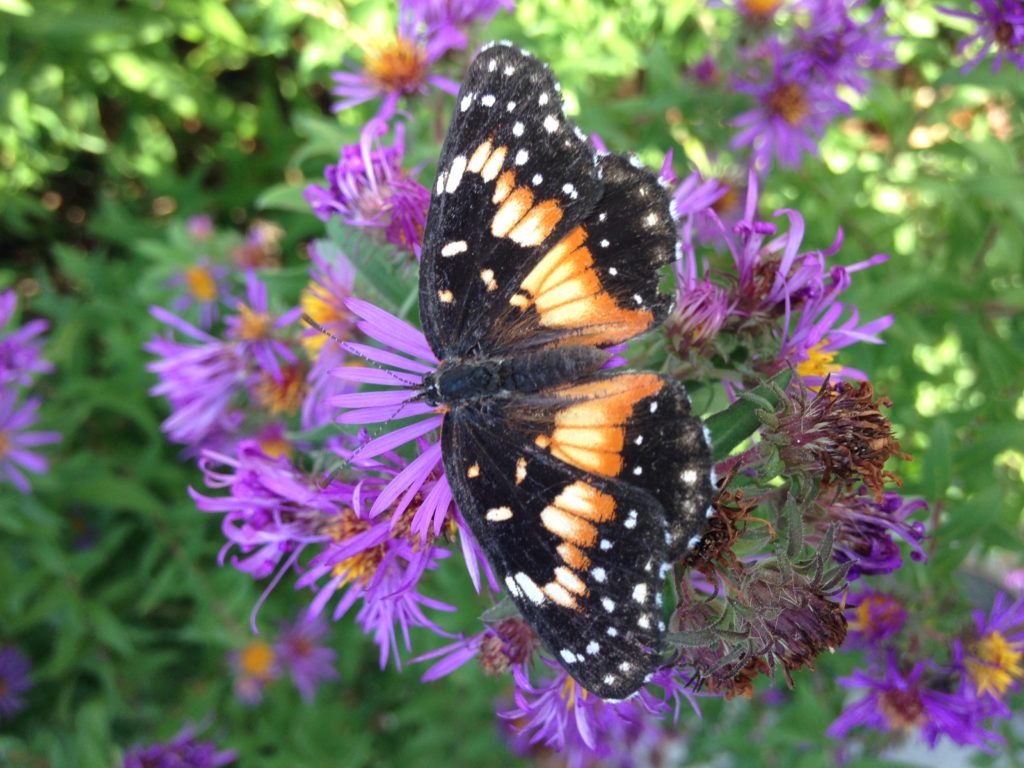
Bordered patches are commonly found throughout the southwest US and Northern Mexico, but can be found in Kansas through late fall.
The prairie communities we see are diverse and complex. Plants, intricately woven together, crowd out weeds and harmoniously coexist. When you look at a prairie, you only see about 1/3 of the plant. The root systems that sustain these native plants make up the remainder, because they reach deep into the soil. The first year is so critical to the whole process of getting native plants established. Developing these root systems properly is vitally important and the establishment period takes time. Here are a few steps I take to get my new native plants started.
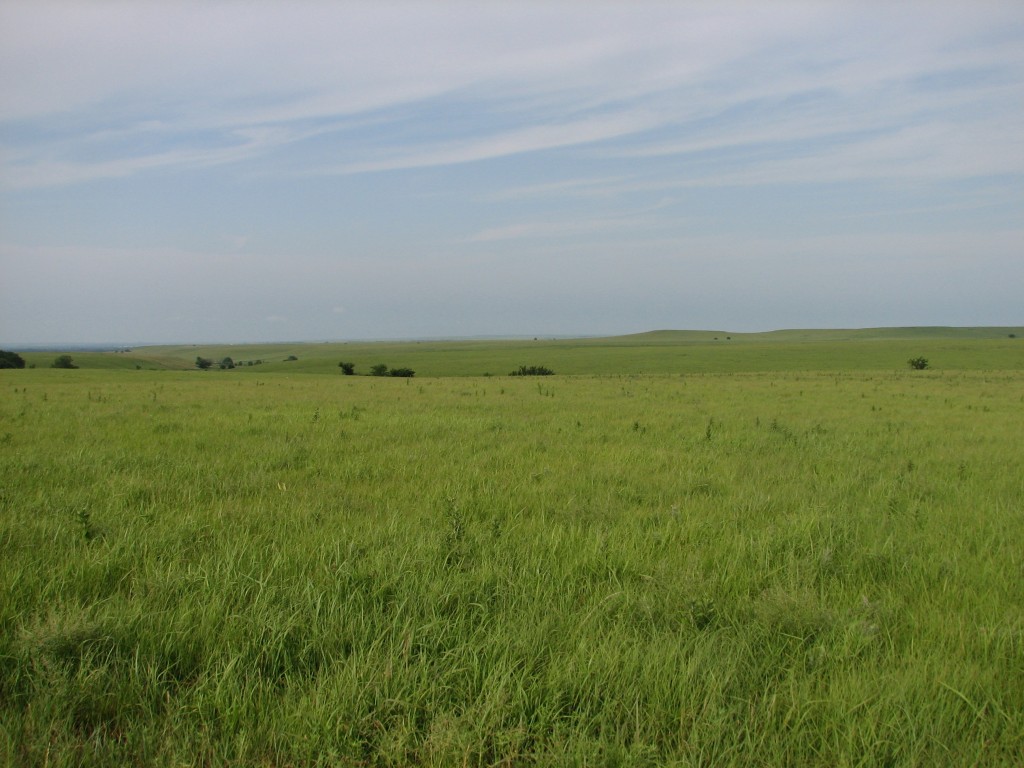
Prairie Photo by Brad Guhr
Planting
I like to lay out the entire area by placing the plants where they are supposed to be planted. This does a couple things: first, it helps with proper spacing of the plants and second, it helps to visualize the final outcome. Think about mature size, rather than what the plants looks like in its infant state.
Now that we have the plants laid out, we can start putting them in the soil. It is critical to not plant them too deep. In our heavy clay soils, it is best to plant them level or slightly higher (1/8 to ¼ inch) than the soil line, especially in heavier clay soil. This keeps the crown drier, which is important for disease control. Over time, these natives will develop at the depth they prefer to grow in.
Lay out entire bed for proper spacing
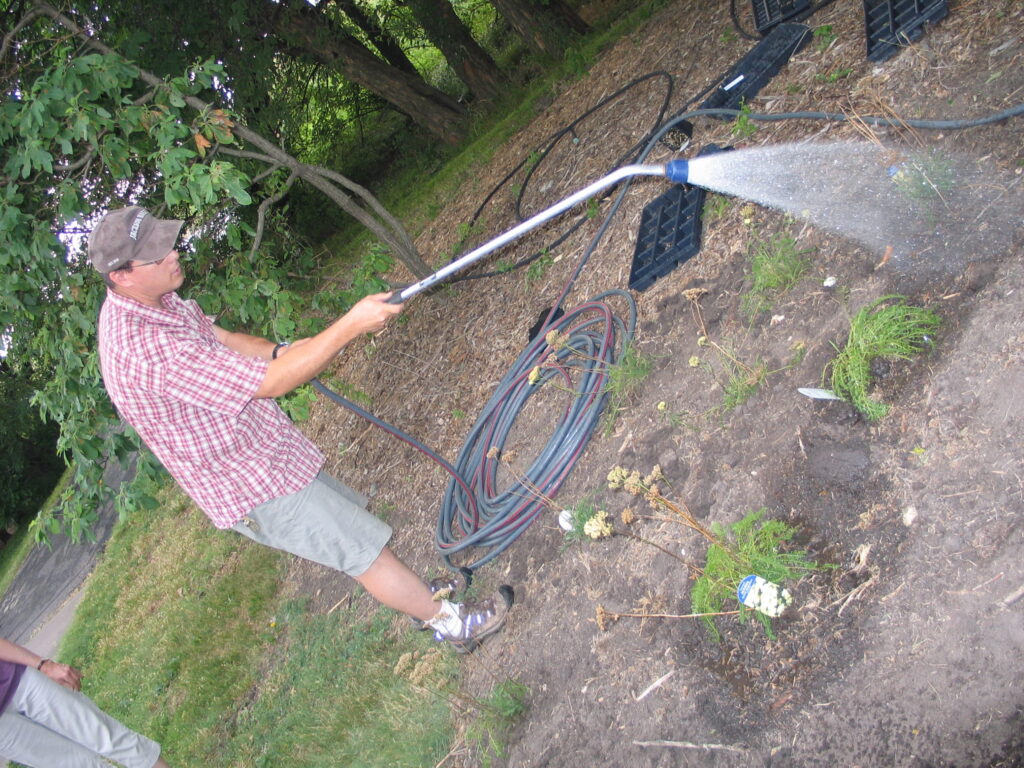
Watering
Now that the plants are in the ground, they need frequent watering until they get established. Even drought-tolerant plants need to be watered daily until they begin to root and connect with the soil around them. Keep in mind that improper watering is the most common reason for plant loss during the establishment period.
For me, I water each new area by hand rather than with a sprinkler. It helps me control the amount of water each plant receives and directs it to the intended plant. I water every day for the first two weeks depending on the weather. After that first two weeks, you should start to see new growth.
For the next few weeks, I water every other day or every third day as needed, monitoring the planting each day for signs of stress/wilting.
Even after this month long process of establishment, each plant must be monitored and watered through the following summer, fall, winter and spring. Native plants are not established until the second summer.
Remember, it takes a few years for those roots to fully develop. If your plants are properly sited, you will not need to water much after the first full year. However, if you must water your area during a dry period, natives will appreciate deep and infrequent watering.
Using a watering wand to direct water on to new plants
Don’t Fertilize
People ask me all the time about fertilizing native plants. As a general rule, I don’t fertilize our native plants especially during that first year. Think about those small plants in the ground and what will happen to them if they are fertilized. They will have tremendous top growth that is not sustainable by the small root system. This will put the plant under stress and slow its progress.
Natives are resilient and adaptive. The deep roots most often will find the nutrients and moisture each plant needs.
Mulch
In the book Planting in a Post-Wild World: Designing Plant Communities for Resilient Landscapes, Thomas Rainer and Claudia West develop the ideas of layering plants. There are usually at least three distinct layers of plants: the upper layer filled with taller structural plants used to frame and punctuate the landscape, the middle layer filled with ornamental flowering plants and the ground level that weaves the other layers together and shades the soil, which controls weeds.
These layers mimic natural plant communities and each layer is important for the health of the plants. A collection of plants living in community can be extremely drought tolerant and water-thrifty.
If you decide to mulch your display beds initially, only place one to two inches of mulch down and keep it away from the stems. This is fine as the beds are first established. As they mature, less mulch is needed because, with the right care, the plants become the mulch. Something to think about is whether you have seen mulch in the prairie? No, the plants eventually co-mingle and intertwine to push out weeds.
Creating a native landscape takes time. With each new plant established comes an expectation of a brighter future. Often, we garden and landscape our yards with the anticipation of what we will get rather than what we are giving back. By adding native plants to our gardens, we will help make our gardens not only beautiful, but also productive and full of life.
May 8 to 17 is National Public Gardens Week and we want you to celebrate with us. The Arboretum grounds are open for visitors to stroll and enjoy the many spring flowers in bloom. Plan your visit to the gardens through the Arboretum website and social media channels.
These are challenging times, but public gardens large and small can provide many physical and mental health benefits. We all need a dose of the outdoors these days. If you can, get outside and enjoy your garden. And if you don’t have your own backyard oasis, I invite you to make our garden your home, or to visit another public garden nearby.
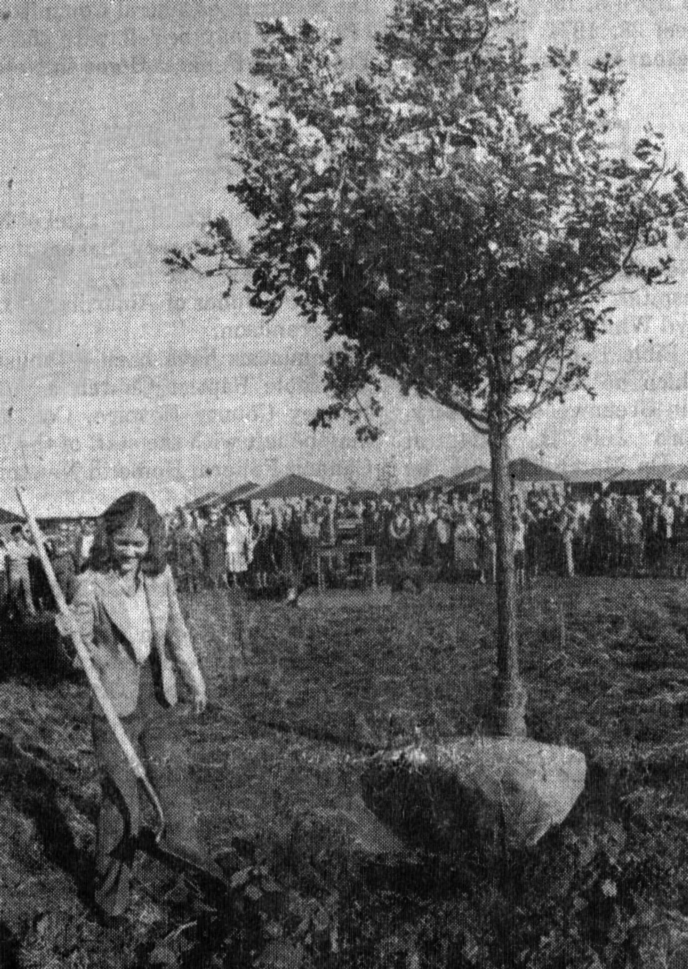
Julia Dyck Roupp helped plant the first Bur Oak tree at the Arboretum on October 10, 1981.
It’s hard to believe that the Dyck Arboretum of the Plains is nearly 40 years old. Founded in 1981 by Harold and Elva Mae Dyck, the Arboretum has developed into a local and regional attraction. Its mission to cultivate transformative relationships between people and the land has never been more important. Whether through education and outreach programs, plant sales, tours, or a quiet walk around the gardens, the Arboretum is a microcosm of the prairie that helps make connections to the land inspiring.
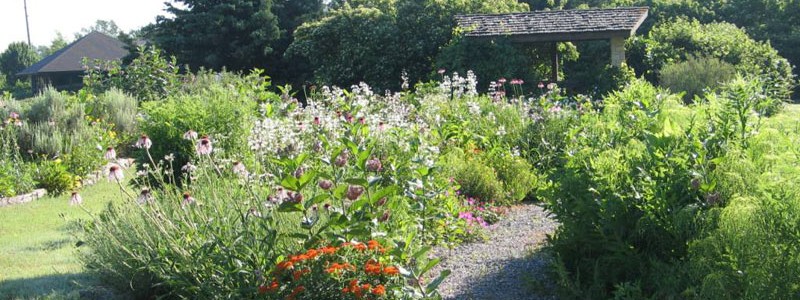
Our xeric beds in spring demonstrate the many ways plants survive periods of drought.
If you are not able to come to Hesston, follow the Prairie Notes blog or review the archives for helpful tips or inspiration for your next pollinator garden. By the way, there are still plants available in our greenhouse. Place an order for curbside pickup or visit the greenhouse to peruse the many wonderful plants for wildlife.
“Let’s go fly a kite”
The BEST way to celebrate National Public Gardens Week with us is to show your love by coming to the Arboretum. We want you to be welcomed and safe. Please give others space and take the proper precautions, but take time to enjoy the beauty of the spring wildflowers.
If you are able, help the Dyck Arboretum of the Plains continue to care for its 30-acre prairie garden, offer horticulture programs, educate students of all ages, and connect people to the land. There are many ways you can support the Arboretum — by making an online donation, becoming a member, purchasing a gift card for the future, or designating Dyck Arboretum as your Dillons Community Rewards recipient organization. We invite you to visit our Giving Opportunities page to learn more.
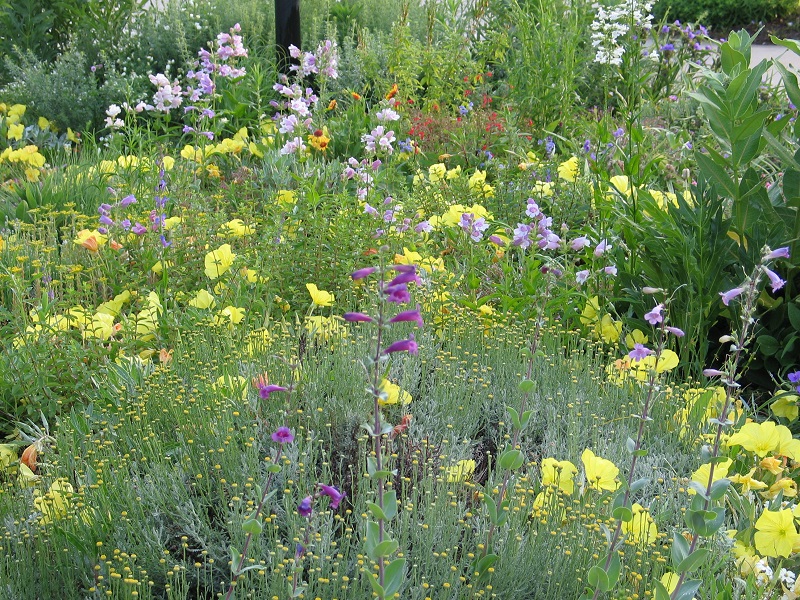
Gardens of every size are important to wildlife, including pollinators. A patchwork of small native plant gardens throughout our cities and towns are the harbor for migrating pollinators or permanent residents to our area. They provide habitat, a safe haven and vital food for survival.
From vignettes such as balcony gardens or a corner in your backyard to larger prairie reconstructions, each garden can be a critical stopover for wildlife. Large or small, a collective effort to establish native plants in landscapes can make a tremendous difference.
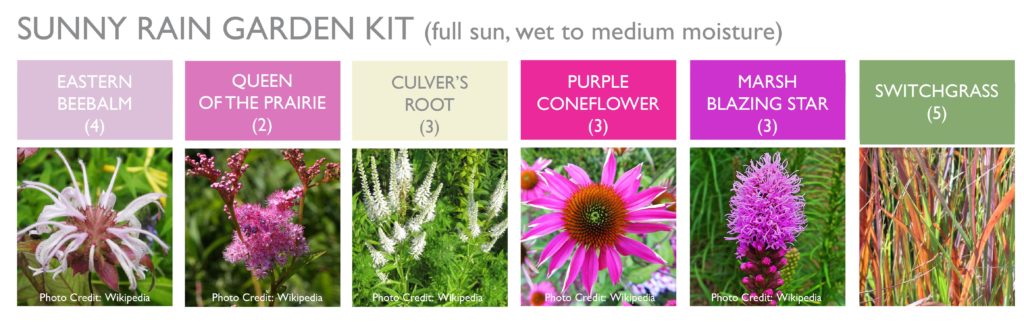
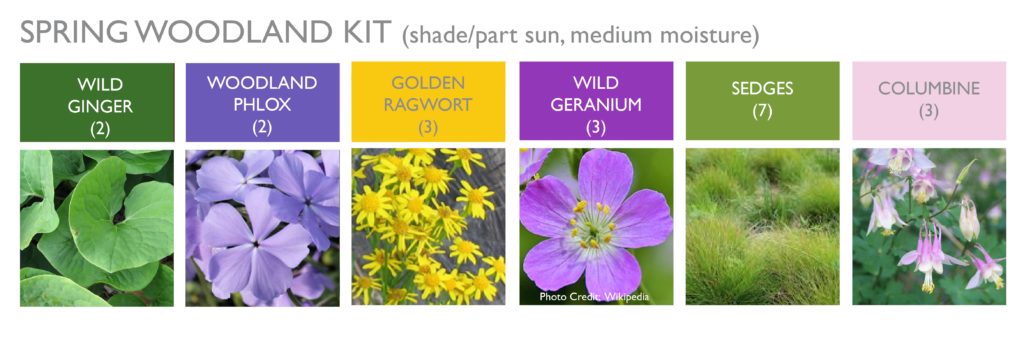
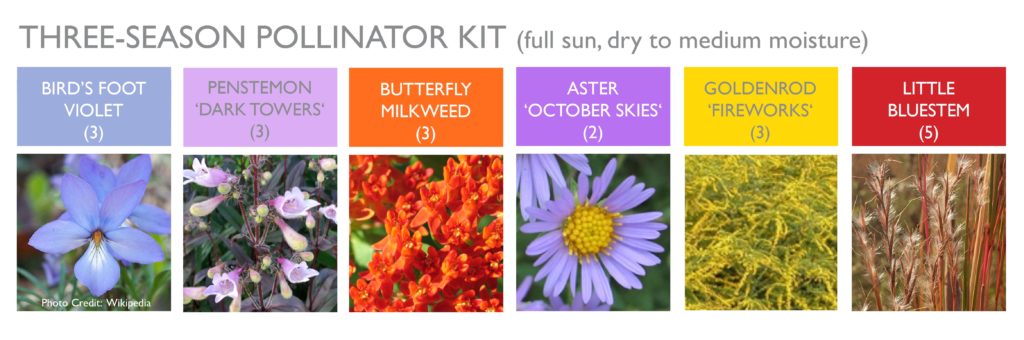
Besides the good they do for wildlife, native plants build the soil, clean water, and filter the air. They are good news for everyone and every thing on this earth. For these reasons, we have put together some custom native plant kits for a variety of garden conditions. Whether you are new to the prairie scene, these kits can be used to get a running start on your next native habitat.
Sunny Rain Garden Kit
(full sun, wet to medium soil moisture)
Do you have a wet section in your yard? These wet-loving natives will do just fine. From late spring to fall, these wildflowers will provide a succession of blooms and even look attractive through the winter.
Spring Woodland Kit
(shade/part sun, medium soil moisture)
These delicate beauties are at home in any woodland setting. We have included a couple groundcovers that will spread to slowing fill in your area. Be rewarded each year by these spring wildflowers.
Three Seasons Pollinator Kit
(full sun, medium to dry soil moisture)
This garden will provide season long nectar for some of your favorite butterflies, bees and other pollinators. Some host plants are also included. Plant these natives in any sunny spot in your yard.
Whatever your motivations for using natives, you will also be rewarded with a renewed connection with the nature. You will not have an ordinary landscape, but one that helps the birds and pollinators you are concerned about. Why not turn your landscape into something that makes a real difference?
To order these garden kits and other plants available for pick-up from our greenhouse, visit our FloraKansas Native Plant Festival page. We look forward to helping you get to know these plants!
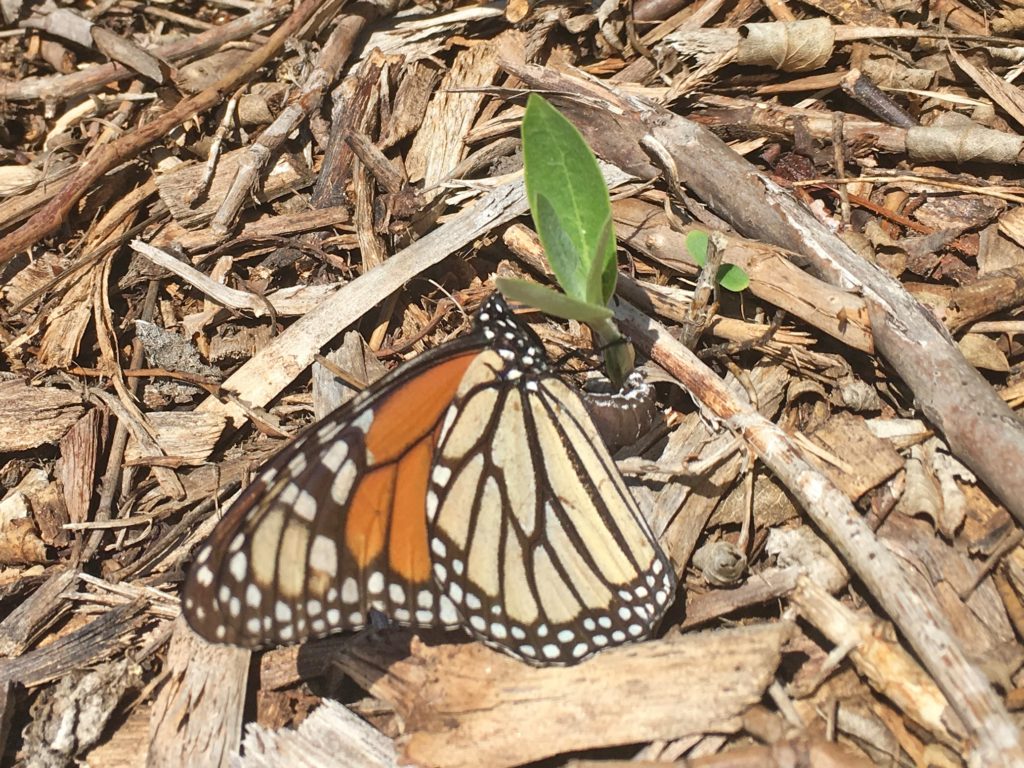
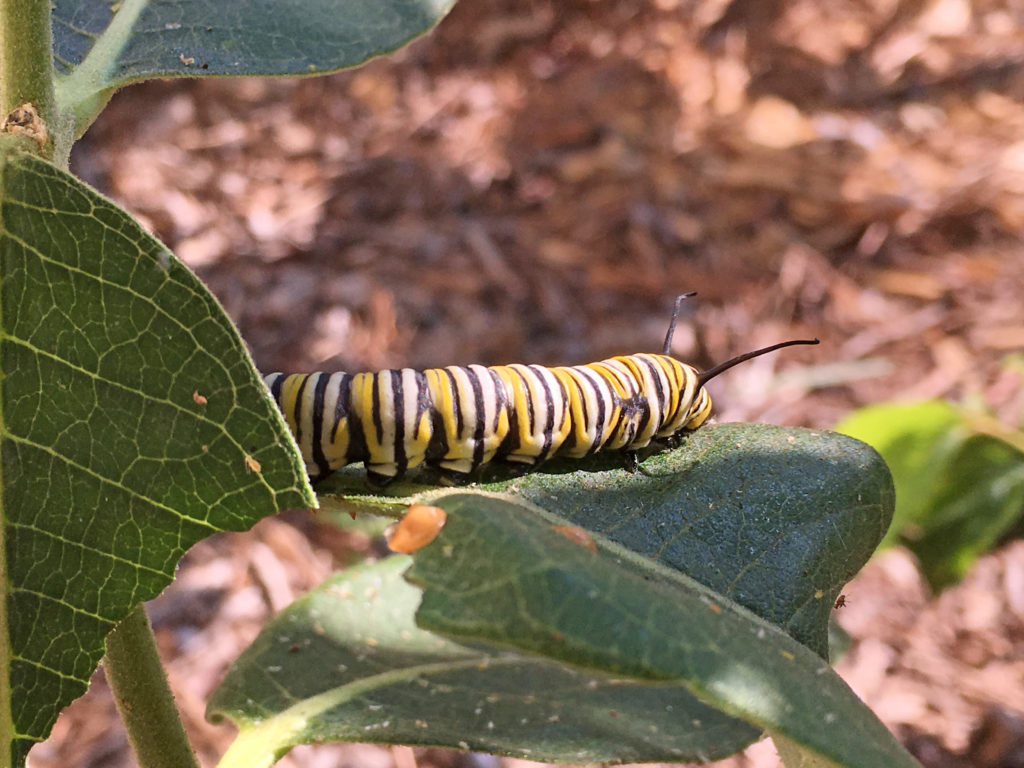
Spring is coming. Nature is not locked down, but continues to come to life. We notice the buds expanding and the crocus blooming. Leaves emerging from the depths and plants all around us waking from their winter slumber. As spring unfolds around us, something extraordinary is about come our way again. The Monarchs are coming.
Monarch ovipositing on common milkweed. Photo by Brad GuhrA monarch caterpillar munching on a milkweed. Photo by Brad Guhr
Providing for pollinators
The monarch’s annual spring migration north from Mexico has begun. You can track their progress through Monarch Watch and Journey North. Each year we take note of when this incredible journey passes through our area. It is amazing to think that these delicate creatures can make this trek north and south every year.
Statistics show that the monarch butterfly population in
North America has declined by over 90% in just the last 20 years. This is disheartening. One of the biggest factors in monarch decline
is the increasing scarcity of its only caterpillar host plant: milkweeds.
Monarchs can’t successfully reproduce, or migrate without milkweeds, resulting
in the species decline.
Monarchs also need other blooming native wildflowers, trees, and shrubs that provide nectar for the adult butterflies to feed upon. This habitat, critical to the survival of the monarchs, continues to disappear at an alarming rate. This natural habitat decline is taking a steep toll on wildlife of all types.
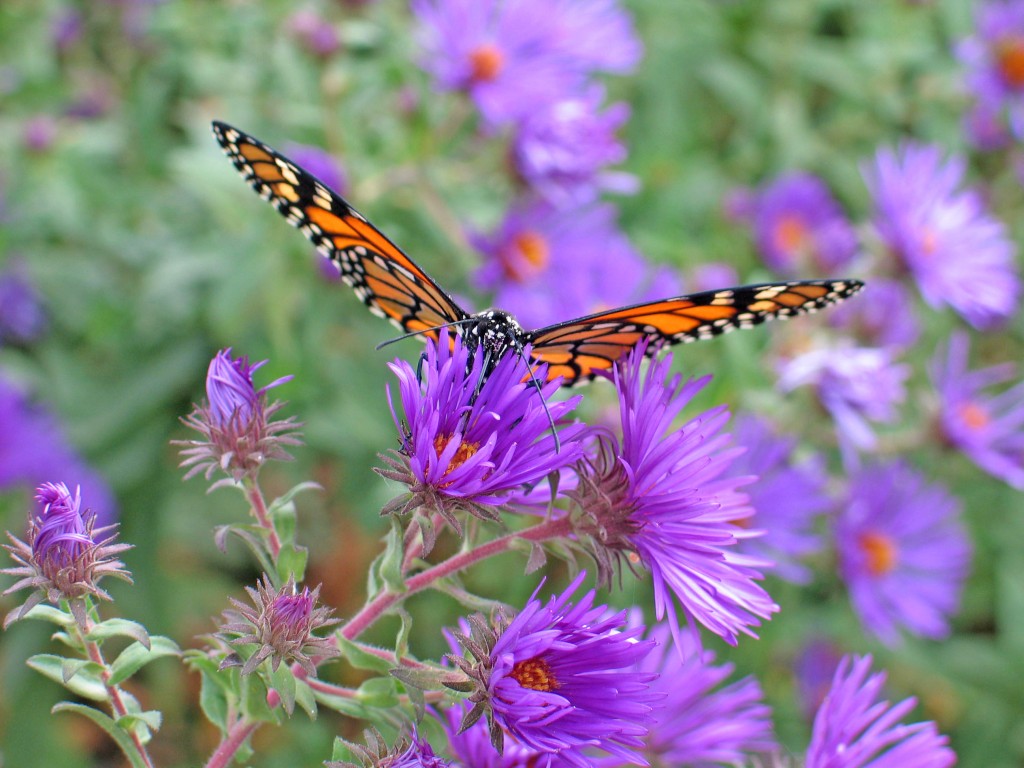
Monarch on New England Aster in the fall. Photo by Janelle Flory Schrock
Plant more than milkweed
Many of us are planting milkweeds and native nectar plants in our gardens to help monarchs survive. Here is a list of plants from our Native Plant Guide that monarchs prefer:
Perennials
Aster ‘October Skies’
Aster ‘Raydon’s Favorite’
New England Aster (Aster novae-angliae sp.)
Blackeyed Susan (Rudbeckia)
Coneflowers (Echinacea sp.)
Coreopsis
Blazing Star (Liatris sp.)
Beebalm (Monarda sp.)
Milkweeds (Asclepias sp.)
Yarrow (Achillea sp.)
Eryngium yuccifolium
Goldenrod (Solidago sp.)
Zizia aurea
Vernonia ‘Iron Butterfly’
Veronicastrum virginicum ‘Lavender Towers’
Prairie clover (Dalea sp.)
Joe Pye Weed (Eupatorium sp.)
Shrubs
Chokeberry (Aronia sp.)
Leadplant (Amorpha sp.)
ServiceBerry (Amelanchier sp.)
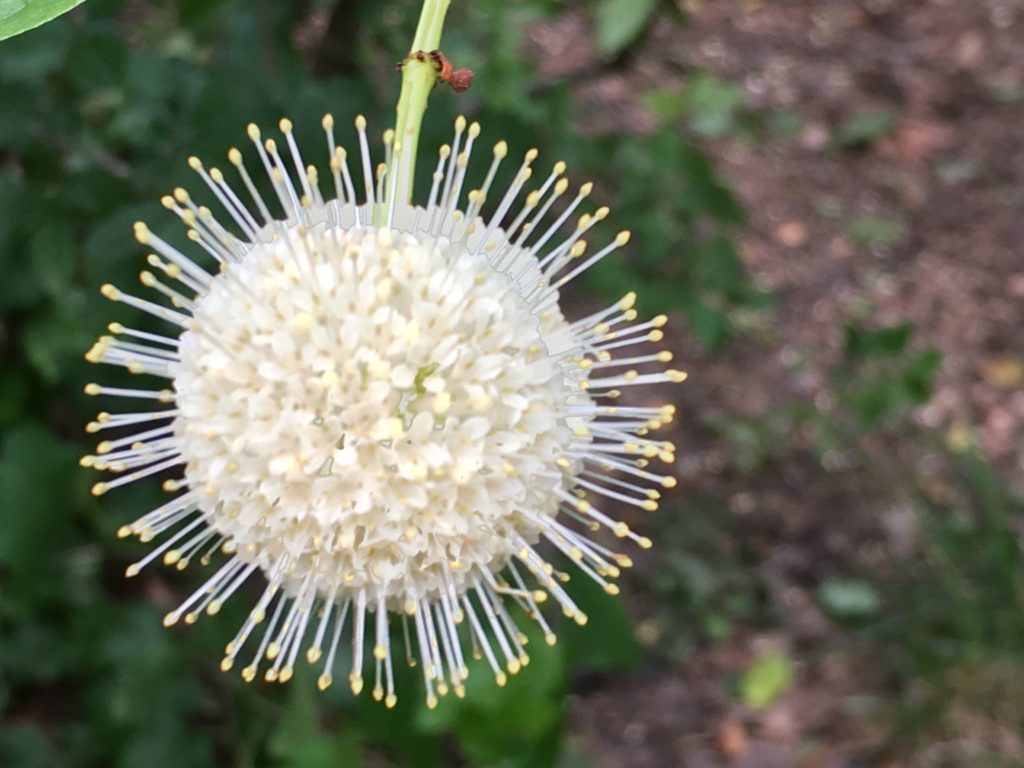
Buttonbush (Cephalanthus sp.)
American plum (Prunus sp.)
Elderberry (Sambucus sp.)
Viburnum (Viburnum sp.)
Buttonbush bloom
Trees
Buckeye (Aesculus sp.)
Redbud (Cercis sp.)
Persimmon (Diospyros sp.)
Linden (Tilia sp.)
Stretch the season
A greater variety of plants will attract a greater variety of wildlife, including monarchs. Try to plant several species of wildflowers with varying bloom times, providing nectar sources that stretch through the season. Different pollinator populations peak at various times through the warm months, so provide for them by having a long blooming garden. Early spring and late fall flowers can help sustain migrating species in the difficult stages of their journey. Research has shown that a lack of late season nectar sources is as crucial to migration success as milkweed. Help these insects get the energy they need all through the year!
If you plant even a few milkweeds in your own garden, you can help reverse the fortune of these beautiful insects. Support habitat and other food sources for monarch butterflies and other wildlife by planting native plants. It is always beneficial to reduce mowing, and limit or eliminate the spraying of herbicides and pesticides. You can be part of the ultimate solution, which is to provide the plants monarchs need for their life cycle. Watch for these incredible butterflies. They are coming.
One final thought I came across the other day:
“To plant a garden is to believe in tomorrow.” – Audrey Hepburn
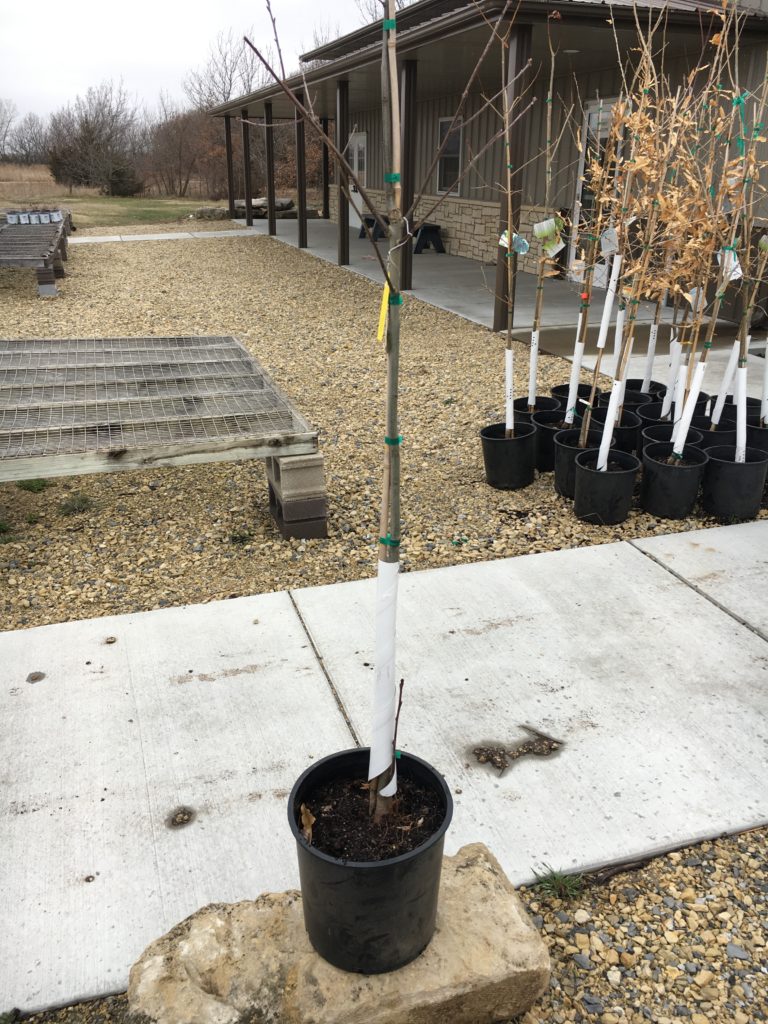
This spring is going to be anything but normal. I know that’s an obvious understatement. All this social distancing has made me think of the many things I need to get done around my house. Social distancing time may be beneficial and help me stop procrastinating. My house needs to be painted. I need to add a fresh layer of mulch on my front flower beds. Another thing I was thinking about was planting another tree.
For those of you who are looking for things to do with your children who are home from school, planting a tree is a great activity to do together outside. And with the 50th Anniversary of Earth Day on April 22nd and Arbor Day on April 24th, there are many related online educational resources available to help talk about the importance of trees and caring for the earth.
So in that vein, here are the steps I take when planting a tree.
Choose the right tree
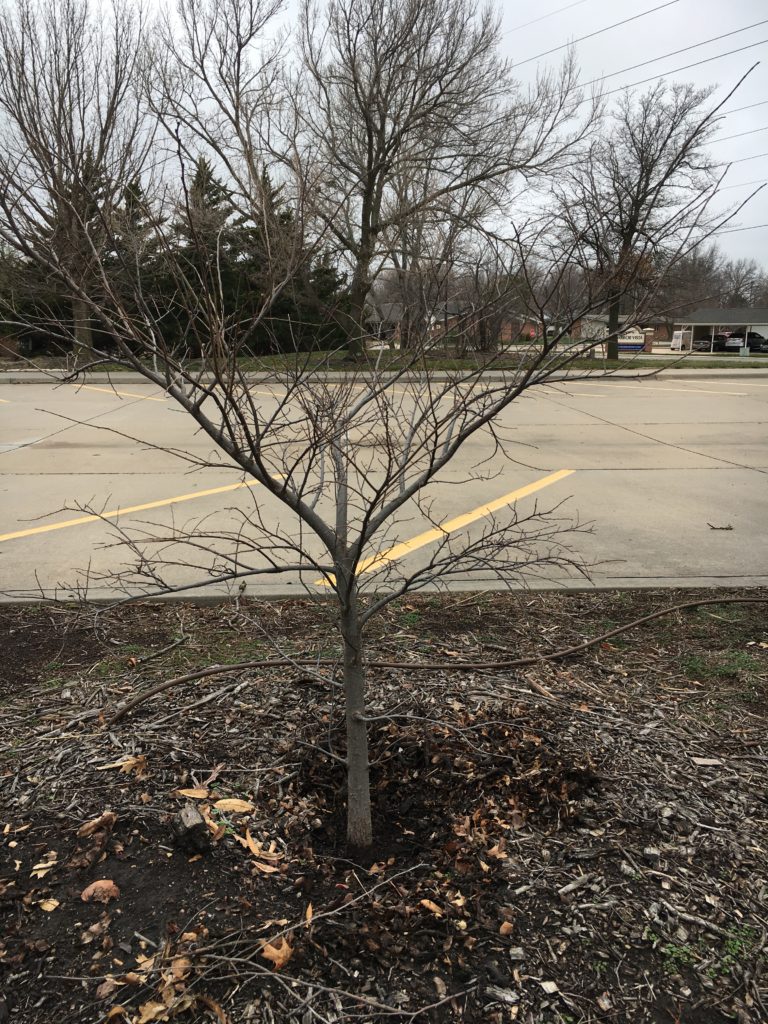
I work from a short list of trees I know will grow well in our area. Some of my favorites are: Caddo sugar maples such as ‘John Pair’ and ‘Autumn Splendor’, Shumard Oak, disease resistant crabapples, Shantung maple, and bur oak. There are so many good options for our area, but make sure you are aware of the tree’s mature size. This will affect power lines, crowding buildings and porches, and heaving sidewalks. See our Native Plant Guide or recommended plants from KSU extension for other options.
Shumard Oak ready for planting
Dial 811
We have all seen the cheesy commercials to “dial before you dig”, but the truth is it’s important to locate utilities. It doesn’t cost anything. You just give the location and then wait a few days for them to flag the area. It is worth making the call rather than guessing while you’re digging.
Locate the tree
Depending on the tree, some may be easy to find while others may take some time. We recommend smaller trees that are ¾” to 1 ½’ caliper trees. In our experience, these smaller caliper trees tend to root faster and acclimate to the site better than larger 2-3 inch caliper trees. Plus, they are more economical and as I get older, I am less willing to wrestle with a 200 pound root ball than I used to be.
Before Planting
As you look at your new tree in a pot or balled and bur lapped, you must find the root flare. This is the point where the trunk widens to transition to roots. If the root flare isn’t visible, you will need to remove enough soil until it is exposed. This is a critical step to insure the tree is not planted too deep because this root flare needs to be slightly above the soil line. Sometimes, nurseries heap two to three inches of soil on top of the flare, causing you to plant it too deep.
Dig a proper hole
Dig and measure, dig and measure so you don’t dig too deep of a hole. Make sure the root flare is a couple inches above the soil line. The tree needs to sit on solid soil, not loose soil that will settle and move the tree deeper. Make the hole two to three times the diameter of the root ball.
Plant the tree
Before putting the tree in the hole, remove all wires, twine or anything else tied to the tree. If you don’t, these ties and wire can girdle the trunk or branches and cause severe damage.
Once the tree is in the hole, orient the larger branches to face south. The prevailing winds are from the south, which force branches to grow on the north side of the tree making it lopsided.
Once oriented, carefully remove the wire basket and cut circling roots from potted trees in two or three spots around the root ball. This process will encourage new outward rooting of the tree.
Back fill with the same soil you removed from the hole. Don’t amend the soil with something like peat moss, because you want the tree to immediately root into original soil, not some artificial environment. Trees planted into peat moss or amended soil have toppled over by wind because they just circled in that loose soil, never venturing out into our clay soils. Don’t give them an option, force the trees to grow in our challenging soils from the start.
There is no need to fertilize at this time either. Fertilizing forces growth that cannot be supported by the new root system. If you need to fertilize, it is better to wait several years until the root system is more established. I don’t add root stimulator either. In my opinion, it is an added expense that doesn’t benefit the plant enough to justify the cost.
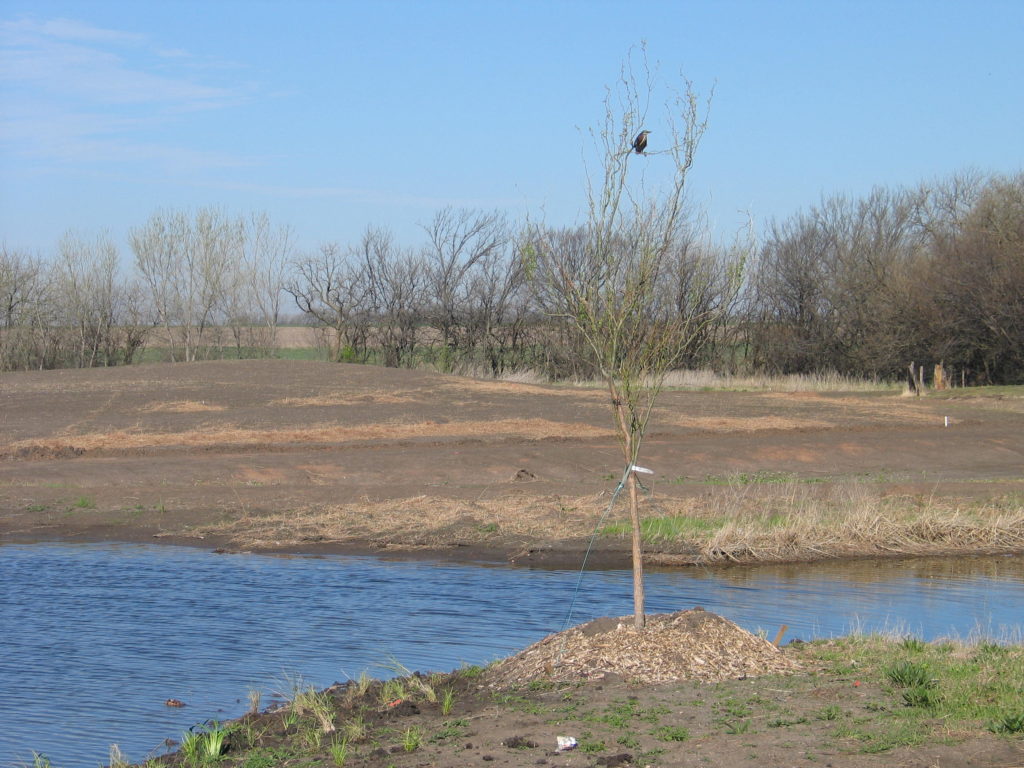
Build a basin for watering
After the tree is properly back filled, I like to build a small basin around the tree. This will help with watering the tree, but also slowly settle as the back fill settles. This basin can be mulched to help with cooling the environment, retaining moisture and controlling weeds. Give it a good soaking at this time.
Basin around an American Elm
Staking the tree
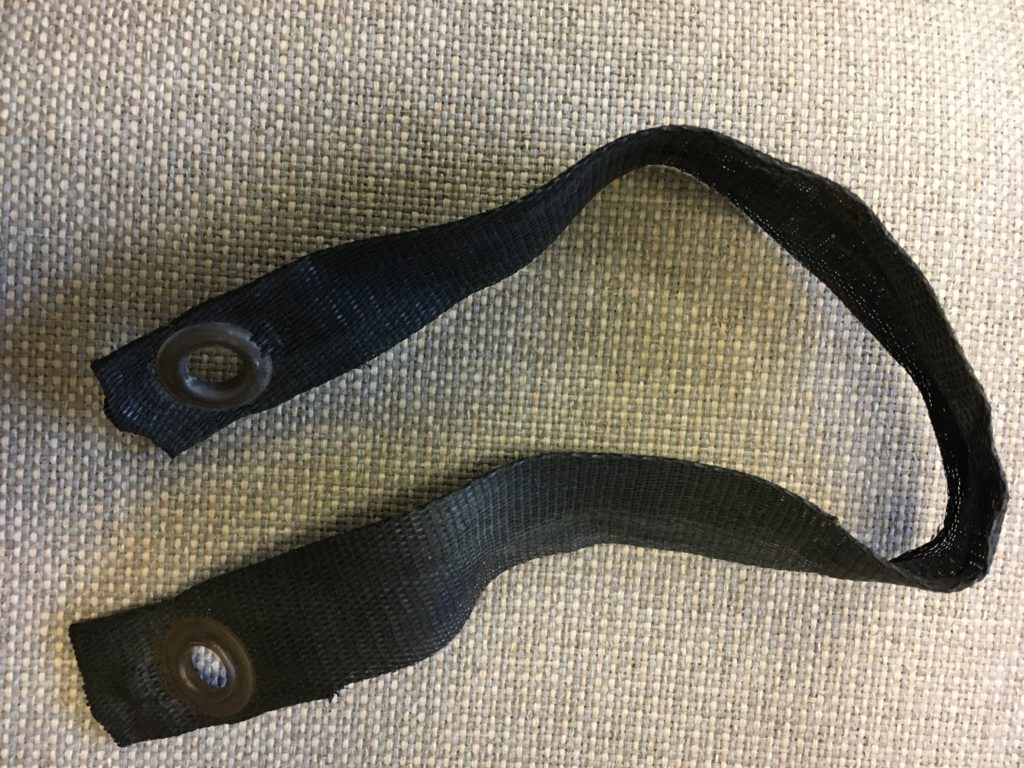
Most smaller trees will not need to be staked. It has been proven that trees will establish quicker when left to move with the wind, which make the trunks stronger. Larger trees will obviously need to be staked the first year, but stake only when necessary to keep the tree from toppling over until roots can anchor the tree on their own. If you do need to stake a tree, we put one stake on the north side and two on the south side of the tree. These stakes are evenly spaced around the tree. Don’t use old garden hose but rather true tree straps around the trunk of the tree tied back to these stakes. After one year, remember to remove all of the stakes, wire and straps from the tree.
Weeping willow with basin and stakes on bank of rain gardenTree strap used for staking trees
Maintenance after planting
It is better to wait to do any pruning on the tree for the first year. The only exception would be removing any damaged branches. With the basin you have created around the tree, it makes it easier to water it thoroughly once a week for the first year depending on rainfall. Keep in mind that it takes a year or two to develop an adequate root system to sustain a tree on its own without supplemental watering.
I have a placard at my desk with a quote from Martin O’Malley that says, ‘Reversing deforestation is complicated; planting a tree is simple.’ This post seems rather lengthy, but the process of planting a tree goes rather quickly once you get started.
At our Native Plant School sessions, the topic of weed control often comes up. When establishing new beds or planting buffalograss, eradicating weeds prior to planting is critical for success. Hand weeding can be time consuming on these larger areas. Often we first use chemicals to control difficult weeds in our landscapes and garden areas without thinking about other options or ramifications of the chemicals we use. Solarization is another technique you can use without reaching for the chemicals to control problem weeds.
What is solarization?
Solarization is the process of covering an area with clear plastic to heat the soil and kill weeds and seeds in the top six inches of soil. If done properly, the use of chemicals to control weeds is not necessary.
Solarization can be an effective method of controlling many weeds such as bermudagrass, bindweed and other annual weeds. Keep in mind that some of these weeds have extensive root systems and many re-sprout, even after being subjected to super high temperatures. It may take several solarization attempts to completely eliminate them from the area. In the end, it may take a few more months before you are ready to plant, but you have not used chemicals to control these problem weeds.
Steps to Solarization
It is best to use this method during the longest, hottest days of summer. The goal is to get soil temperatures under the plastic above 140 degrees. It is easier to reach these temperatures in June through August.
This is a process that will last for a couple months. Plan ahead in your planting schedule so solarization has enough time to work. Some of the more aggressive weeds will not be eliminated in just a few weeks.
It is best to remove existing growth and lightly till the entire area.
Remove stalks and debris that will puncture the plastic.
Rake the area smooth. It is critical that the area is completely flat so plastic lays right on the soil with no air pockets.
Irrigate the entire area so it conducts heat better. The soil should be moist to 12 inches deep, but not muddy. This is a real trick in clay soils. This is a critical step in the process, because it is not recommended to re-irrigate after the solarization process has started.
Dig a 8-12 inch trench around the solarization area.
Lay one entire piece of plastic over the area and tuck the edges into the trench you just dug.
Cover the edges of plastic in the trench with soil, pulling plastic tight as you move across the whole area. This makes a good seal around the entire site.
Source: W. Suckow, ucanr.edu
Solarization incorporates the same principles of a hot compost pile to kill weed seeds and break down organic matter. We have used this technique in smaller areas here at the Arboretum from time to time with mixed results. Some have been very successful, but others have not completely eliminated some of the target weeds. Smaller areas have had better results than larger areas especially when dealing with aggressive weeds like Bermudagrass.
In the end, I think solarization should have a place in your weed control options. It is a nice alternative to using chemicals. Give it a try sometime.
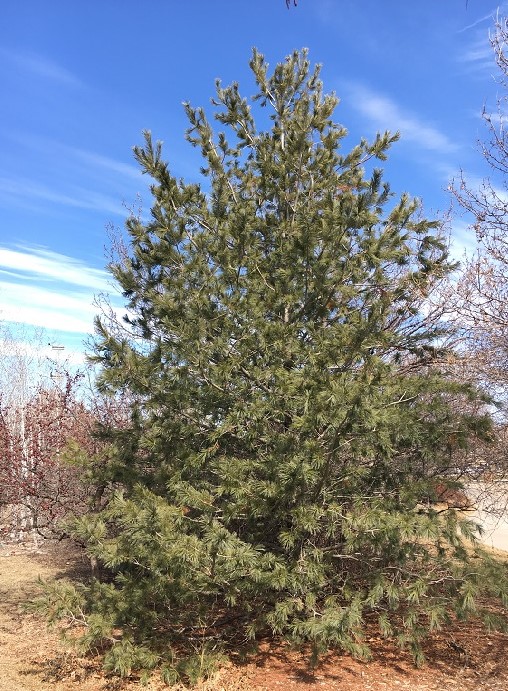
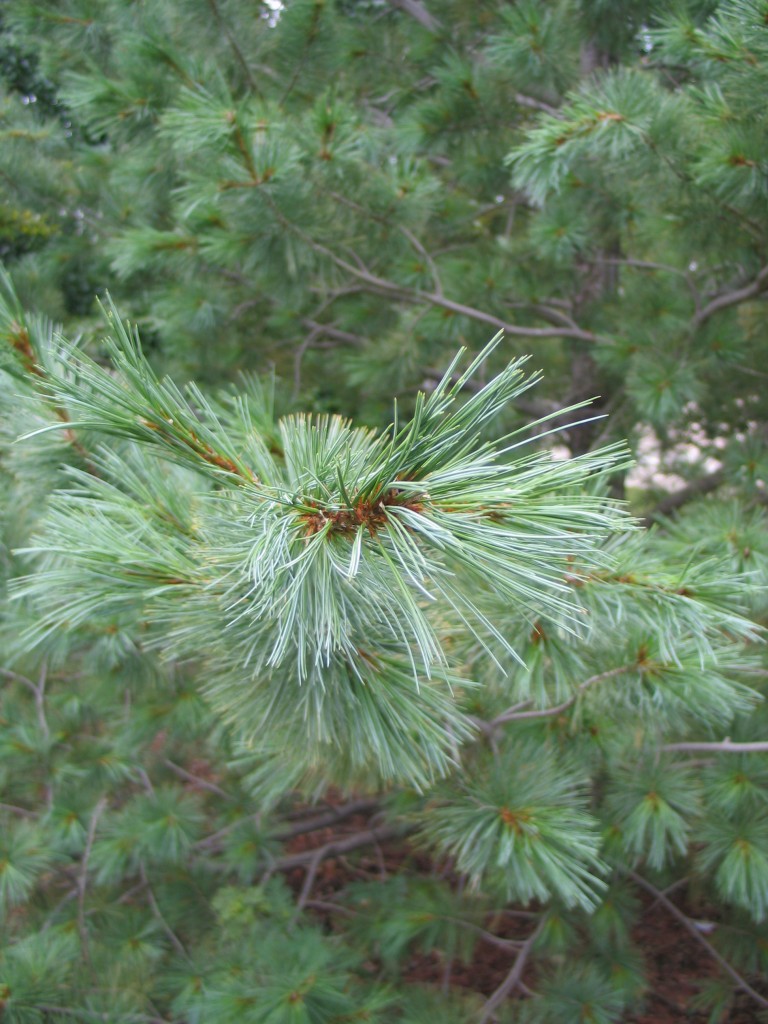
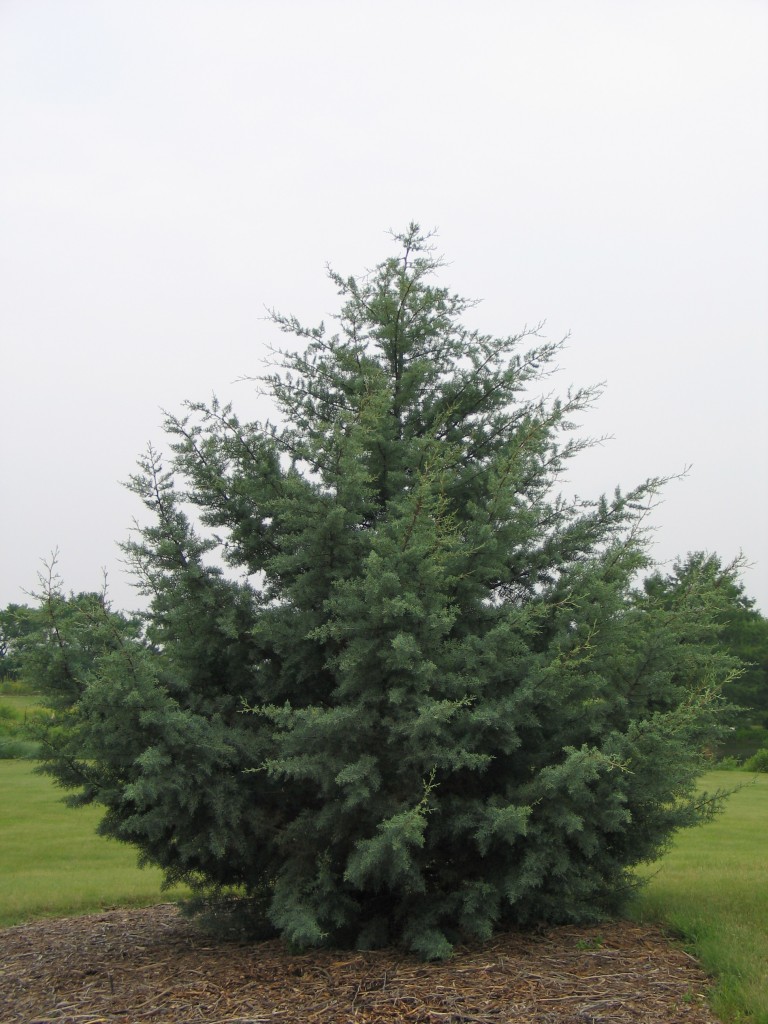
When one thinks of classic and elegant conifers, Eastern white pine often comes to mind. Unfortunately in the Great Plains, summer heat, wind and drought restrict growing Eastern white pine to only well protected sites. We have a stand of Eastern white pines strategically planted with protection from these adverse conditions. Even these few original Eastern white pines planted in the early 1980’s are slowly expiring because of environmental challenges.
Fortunately, there is an alternative. The Southwest white pine, Pinus strobiformis, is a tough, drought- and heat-tolerant conifer. Its native range extends from Texas to Arizona and south to Mexico. They inhabit dry, rocky slopes in mountainous areas.
Southwest white pine planted in 2000
Habit
Somewhat shorter and broader than its eastern cousin, the Southwest white pine reaches 30-60 feet in height at maturity, with a broad, rounded crown. Needles are five per bundle (fascicle), 1.5 to 3.5 inches in length with a dark green to blue-green color. The top and bottom of the needles have somewhat distinct white stomatal lines. Though not as long and soft as the needles of the Eastern white pine, the needles are very soft textured and pliant. The long cylindrical cones mature in two years and produce a brown oval seed that is edible.
Culture
Adaptable to our high pH soils, Southwest white pine prefers well-drained soil in full sun. It is a moderate to fast grower. Young specimens in the Arboretum have grown 10-12 inches per year since they were planted in the mid-1990s.
Also consider a Southwest white pine as an alternative to Austrian pine, which has suffered from Sphaeropsis tip blight in the last decade. It can be used as a large specimen or in a screen or windbreak planting. Its hardiness, drought resistance, and fast growth are definite attributes to consider in our challenging climate.
Other evergreen and conifers we use here at the Arboretum: Arizona Cypress, ‘Taylor Juniper’, ‘Canaertii’ Juniper, Black Hills Spruce, Pinyon Pine and Vanderwolf’s Pyramid Limber Pine. There are no guarantees on any of these. They may develop blights, or other diseases in time. Certainly they are all attractive to bag worms.
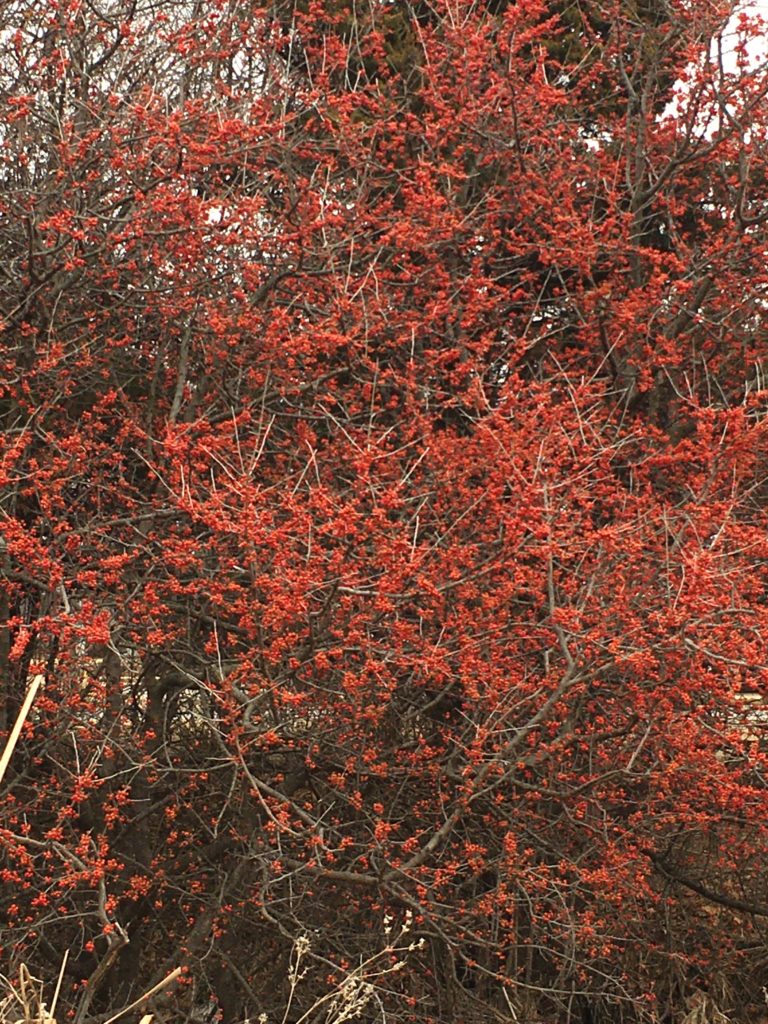
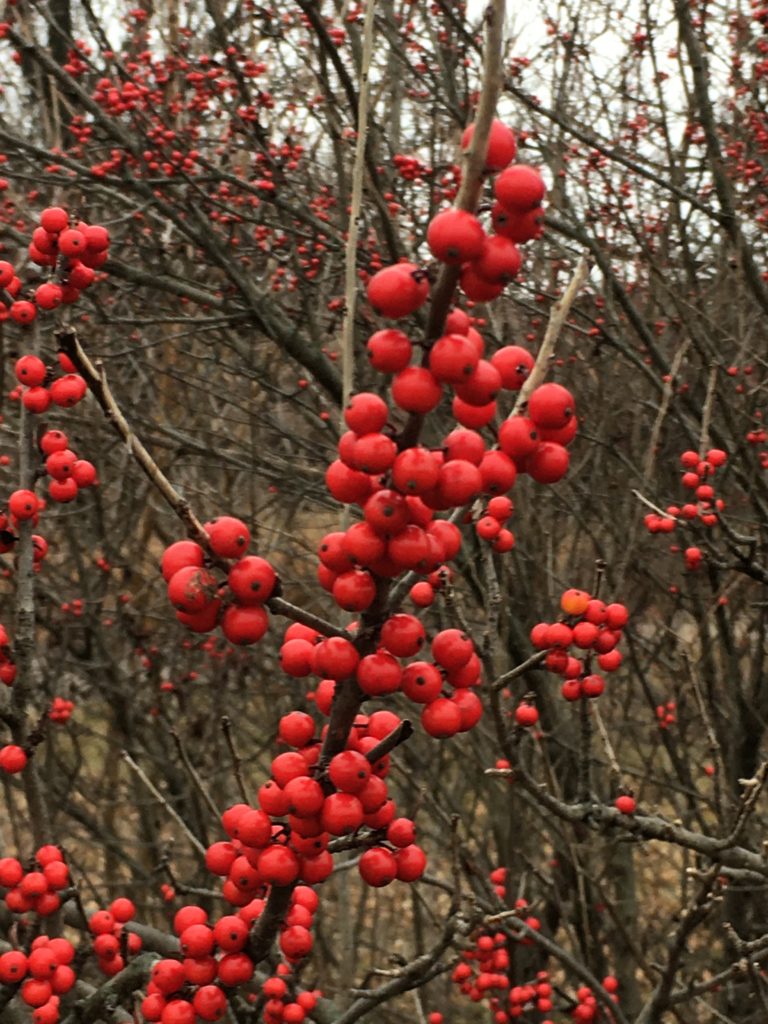
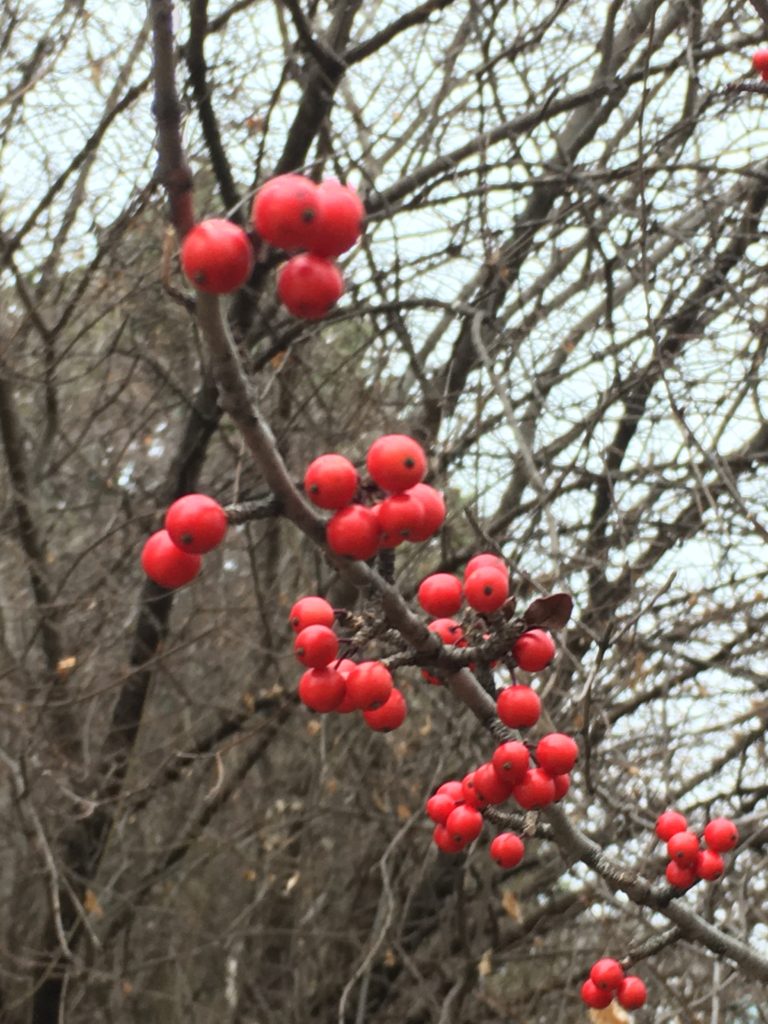
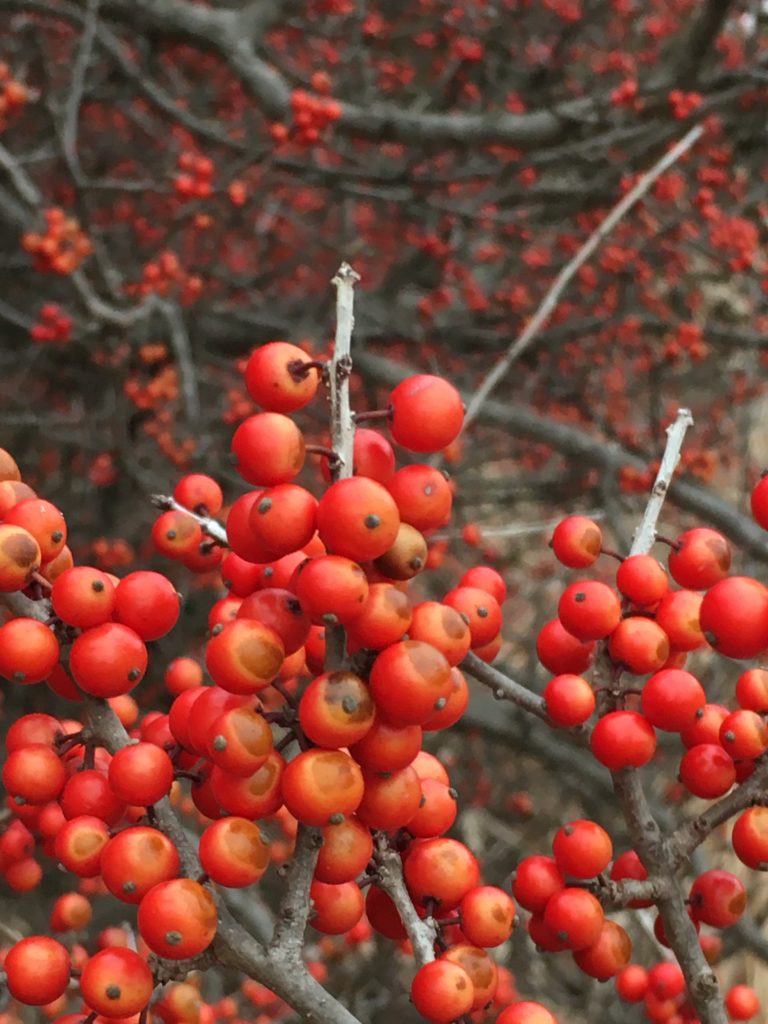
If you have been walking through the Arboretum over the past few weeks, you probably noticed the deciduous holly. Ilex decidua gets so much attention because of its incredibly lustrous fruit of red, orange, and yellow. As the leaves fall away each year in November and December, the fruit magically appears and remains on the tree for most of the winter.
‘Sundance’ Deciduous Holly
Fruit
These colorful berries are not a preferred food of birds, but become more appetizing when snow covers the ground. Often trees are completely stripped of berries in a couple days after a heavy snow, because other food sources are not readily available. Many birds, including cedar waxwings, flock to these trees to feed on the fruit later in winter.
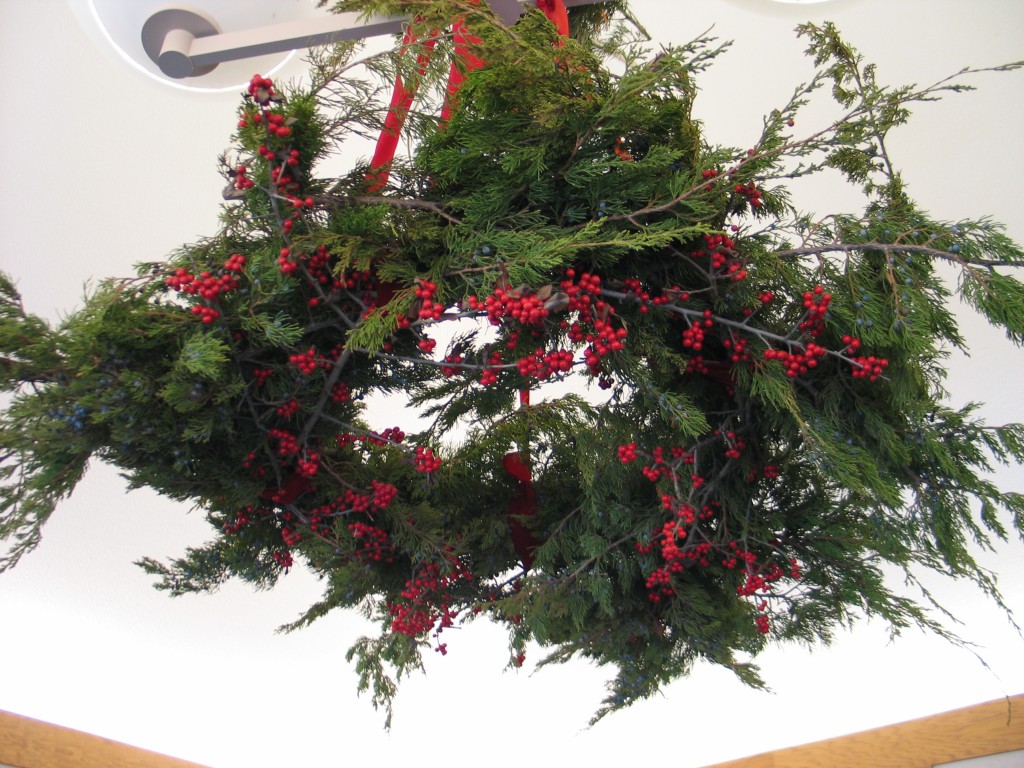
Deciduous holly requires male and female plants to produce fruit. Tiny white flowers appear before the leaves in March and April. We have several male selections planted in close proximity to the female plants to assure the development of the attractive fruit each year. It is best to keep the fruit producing female plants in the foreground and tuck the male forms out of sight. We have used the branches with fruit cluster as holiday decorations.
Holly berries as part of an evergreen wreath
Habit and Site Preferences
Deciduous holly, or Possumhaw as it is often called, is a small tree or large shrub that grows 15-20 feet tall. The smooth gray bark of the trunk and branches hold the fruit on the upper half of the plant. Here in the Arboretum, we have both tree forms and suckering shrubs. Either is attractive and the suckering shrubs making a nice screen. As their name indicates, they are deciduous, dropping the leaves in autumn to fully reveal the berries.
These deciduous trees grow best in full sun or partial shade. Trees are more vigorous and produce more berries in full sun. We have several along our creek channel and some around our parking lot. They are quite adaptable to wet or drier conditions.
A few selections at the Arboretum:
‘Council Fire’ – An upright, rounded form growing 15′ tall and 10′ wide, this plant is superior for its ample fruit production and retention in clusters along the stems.
‘Council Fire’
‘Red Escort’ – This is a male selection (pollinator) with glossy leaves and a habit to 20′ tall.
‘Warren’s Red’ – This cultivar grows on the eastern border of the Arboretum parking lot. It is very hardy and consistently produces fruit. It is more shrub-like and upright, ultimately reaching 15’ tall.
‘Warren’s Red’
‘Sundance’ – Nice tree form to 10’ tall and 8’ wide. It has the longest lasting fruit, which is orange-red.
‘Sundance’
We are planning to have several deciduous holly varieties at our spring FloraKansas Native Plant Festival. Check out our Native Plant Guide for these cultivars along with Ilex verticillata varieties. Each will give you great winter color and habitat for the landscape. We love their hardiness and toughness as well as the beautiful fruit. Why not give them a try?


